Types and Conditions of Bevel
Construction Details
Common Door Construction Terms
Hand of Doors and Locks Diagram
Figuring Door Hardware
Door Knocker Installation
The following instructions are a general guide to knocker installation. We have selected one of our typical knockers as an example. Other knockers may be installed using similar techniques.
- Locate the center of the door.
- Locate desired height of knocker and mark the top hole.
- Drill top hole. The size of the hole should be the same as the shoulder of the blind nut which is 7/16″. See Figure 1.
- Carefully enlarge the hole on the outside of the door so it accepts the knocker post. This is done by first re-drilling the hole to match the size of the flats of the post. Finish with a sharp chisel. The knocker post in this example is 1/2″
Repeat this step for the other posts. See Figure 1.
Note: You want the knocker post to fit tightly into the door. - Insert knocker into the top hole with the rosettes in place. See Figure 2.
- Mark the threaded post 1/4″ shorter than the door thickness but NO SHORTER.
- Cut the threaded post to length and complete installation.
Note: The blind nut should be flush with the door. The shoulder of the nut is morticed into the door.
-
- Figure 1 – typical knocker assembly
-
- Figure 2 – rosette
Thumb Latch Installation
What you will receive and some diagrams to guide you.
-

- Retainer
-

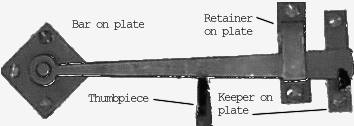
- Retainer on plate
-
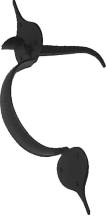
- Handle and thumbpiece assembly
-

- Keeper
-

- Keeper on plate
-

- Latch bar
-
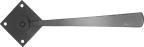
- Bar on plate
-
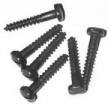
- Screws (7) or (13) with b.o.p.
-

- Rattail keeper
-

- Reverse keeper
-
- Room side view of door
-
- Hall side view of door
-
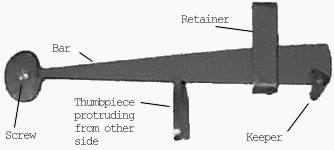
- Figure 1 – Regular latch bar
-
- Figure 2 – Bar on Plate
Instructions:
1. Mount the handle on the hall side of the door. Please see door construction terms.
- Cut a small slot for the thumbpiece to pass through. This is done by drilling three, 3/16″ holes, one above the other. Use a thin wood chisel to remove the remaining wood from the slot. Finish the slot with a rasp.
Note: You only need a small slot for the thumbpiece to pass through. Remember the thumbpiece only needs to move about 1/2″. Just enough to lift the latch bar. - Slide the thumbpiece through the slot you just made and make sure it moves freely.
- Mark the holes for mounting the handle with a pencil. Predrill so you don’t split the wood.
- Attach the handle to the door using the six wood screws provided. Make sure the thumbpiece still operates freely.
Note: If the thumbpiece does not move freely, remove the handle and open the slot very slightly with a rasp until it does.
2. Mount the latch bar on the room side of the door. See note below for “Bar on plate.”
- Position the latch bar so it is resting on top of the thumbpiece protruding from the door (see Figure 1 above).
Note: Make sure the latch bar is sitting level. - Mark hole in bar with a pencil and Predrill.
- Attach bar to door with wood screw.
- Mark position for retainer about half way between thumbpiece and end of bar.
- Predrill 1/8″ holes for retainer.
- Hammer retainer into door making sure that the latch bar will still move up and down freely. Clinch the ends of the retainer.
Tip: Wrap an old towel or piece of heavy cloth around a block of wood. Place this block of wood over the retainer to hammer it in. That way, you won’t scratch the paint on the retainer.
3. Mount the keeper to the door casing (door jamb).
- Raise the latch bar
- Position the keeper on the door casing so the latch bar just clears the top of the keeper. Mark with pencil.
- Predrill a 1/8″ hole so you don’t spit the wood.
- Carefully hammer the keeper into the door casing using a block of wood so you don’t mark the paint.
Note: The Rattail keeper is mounted in the same manner except for the addition of a nail or screw at the bottom of the keeper.
Note: The “Bar on plate” style of latch bar is mounted in the same manner. The difference is that you will mount everything with wood screws. See Figure 2.