Pendant Fixture Installation
Assembly and Installation Instructions for W150, W151, W152 Pendant fixtures
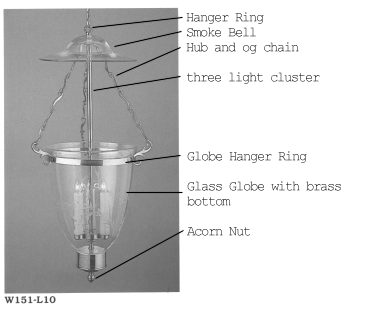
Parts List:
- 1 Top ring and canopy assembly (not shown)
- 1 Hanger ring
- 1 3 light cluster with telescoping tube
- 1 Hub and og chains
- 1 Smoke Bell (glass dish)
- 1 Brass band with hooks (globe hanger ring)
- 1 Glass globe with brass bottom fitting
- 1 brass acorn nut
- 1 7/32 hex wrench
- 3 “S” shaped hooks
- 3 candelabra base lamps

Note: only the W151 fixture is shown. The W150 and W152 are similar in construction.
Assembly Instructions:
- Fasten top ring and canopy to electric box; loosen set screw so canopy slides freely down to ring.
- Place hub and og chain on 3 light cluster tube at top with chains hanging down.
- Slide smoke bell on top of hub and chains.
- Fish wire through the Hanger ring, slide hanger ring down to male thread on the 3 light cluster.
Note: do not over tighten hanger ring. - Attach “S” shaped chain links to ceiling canopy.
- Attach 3 light cluster to the S chain, fish wire through the canopy assembly. (hold the bottom of the 3 light cluster until the wire has been fished to the electric box).
- Make electrical connection, leave enough wire to allow the lower portion of the telescoping 3 light cluster to reach the bottom of the globe.
- Slide up the ceiling canopy and tighten the set screw to hold the canopy in place
- Slide Globe over threaded bottom of 3 light cluster ( on W151 you will have to slide the brass band with hooks on to the glass) until you can attach the brass og chain to the band hooks. Attach the hooks as shown on the photographs.
- Thread the brass acorn nut to the thread protruding through the bottom of the globe.
- Finish by neatly routing the wires through the chain pull any excess wire into the electric box.

