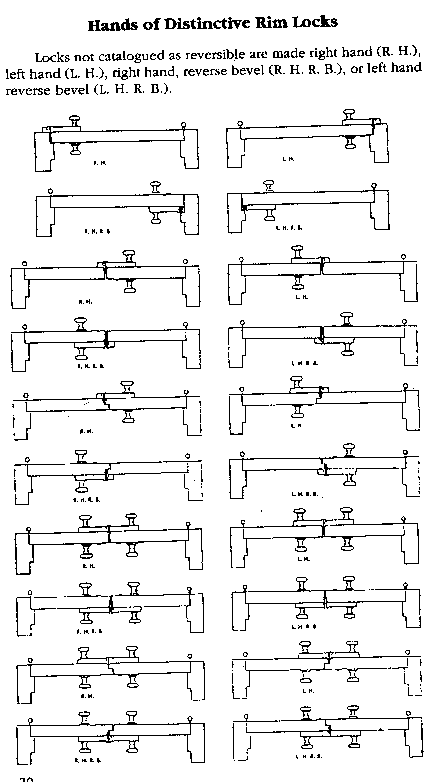
Hands of Distinctive Rim Locks
Surface Mounted Rim Locks
Installation Instructions For Surface Mounted Rim Locks X90 or X710 (Exterior Locks)
- Determine what height you want the lock to be by holding lock on door. Draw a level pencil line on door along bottom of lock.
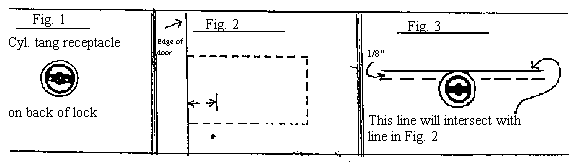
- The hole for the cylinder must be drilled first. On the back side of the lock, locate the cylinder tang receptacle(See Fig. l). Proper installation of carpenter locks, 8 x 4 ½”, and 9 x 6″, iron locks which have a one inch overlap on edge of door requires the overlap to be mortised into the edge the of the door. All others mount even with the door edge. Measure from bolt edge of lock to center of cylinder tang receptacle. Measure same distance in from edge of door. Mark with a short vertical line, 1″ long approximately 1 to 2 inches up from the bottom line already on door(See Fig. 2). Centerline of cylinder is located 1/8″ above the top of the cylinder tang, so you must measure from the outside bottom of lock to the top of the rectangular slot and add 1/8″ (See Fig. 3). Measure up from the bottom line on door and make a horizontal line to intersect with the vertical line.
- Where lines intersect, drill a pilot hole all the way through door (note: be sure to drill perfectly straight and level through door). We suggest you use the same size drill for this hole as is used for the pilot drill on your hole saw or smaller; no larger. Next, on the outside of the door, use a 1-3/8″ hole saw to cut a counterbore 1/8″ deep, no deeper. Then drill through the door with a 1-1/8″ hole saw. (It maybe necessary to drill from both sides, halfway through door depending on door thickness.)
- Mount cylinder in the door using the supplied screws and backplate. Screws may need to be broken off to proper length as will the cylinder tang when mounting lock. Hold lock firmly on door and be sure cylinder key operates lock bolt with ease. Note: Be sure lock is straight and level before marking mounting holes. Continue to hold firmly in place while marking for mounting holes. Mounting holes must be pre-drilled.
- Mount lock with screws provided and be sure cylinder key operates with ease before marking for spindle hole. Mark spindle hole location and remove lock from door to drill. Again, be sure you are drilling straight and level through door. A 7/16″ hole is best.
Keepers (strike plates) for rim locks are made to be mounted flush with the door surface, cut into the jamb and trim if needed. A gap of at least 1/8″ should show between the lock and the keeper.
Knobs, drops, and levers should be mounted with care. See instructions on knob installation.
Installation of X95 and X100 Locks
- Mount lock where needed
- Mark for spindle and remove lock
- Drill a 7/16″ hole straight through door.
- Re-mount lock and knobs (see knob installation).
- On X100 locks, also mark and drill for keyhole.
Installation of Mortise Locks
- Door should be cut out by following standard carpentry practices.
- The key and spindle holes should be carefully located.
- When using any bit key mortised lock as an exterior door lock, maximum security is obtained by not cutting the keyhole to the outside of the door.
Knobs, drops and levers should be mounted with care. See instructions on knob installation.
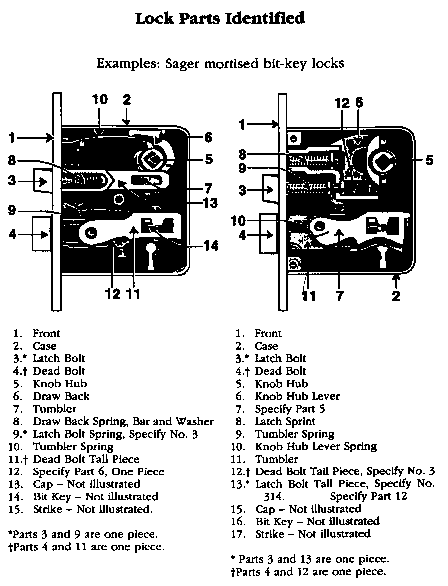
Identifying Lock Parts